Discover the Delight of Homemade Grain-Free Rawnola Cereal
Are you searching for a breakfast option that's not only incredibly delicious but also packed with nutrients, easy to prepare, and completely free from grains? Look no further than
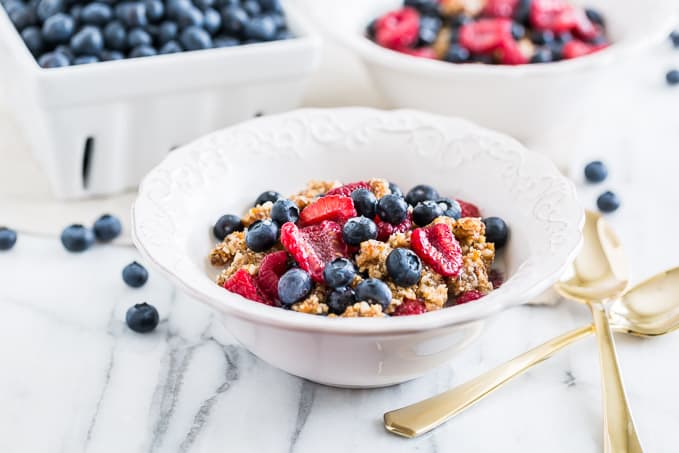
homemade grain-free rawnola cereal. This delightful concoction is a game-changer for anyone seeking a healthier start to their day, or a satisfying snack that supports a grain-free, paleo, or even ketogenic lifestyle. Rawnola offers the comforting crunch and versatility of traditional granola, but without any of the oats or processed ingredients, relying instead on the wholesome power of nuts, seeds, and dried fruits.
Imagine waking up to a bowl of rich, flavorful cereal that fuels your body without the sugar crash or digestive discomfort often associated with grain-based alternatives. Making your own rawnola means you have complete control over the ingredients, allowing you to tailor it to your exact taste preferences and dietary needs. Say goodbye to store-bought cereals laden with refined sugars and artificial additives, and embrace the vibrant goodness of a truly nourishing breakfast. This article will guide you through crafting your own batch of this amazing cereal, offering tips, variations, and all the reasons why it should become a staple in your pantry.
Why Choose Homemade Grain-Free Rawnola? Unpacking the Benefits
Opting for
homemade grain-free rawnola cereal isn't just a culinary choice; it's a lifestyle upgrade. The benefits extend far beyond its delightful taste. First and foremost, the grain-free aspect addresses common dietary concerns. Grains, especially processed ones, can be inflammatory for some individuals, leading to digestive issues, fatigue, and other health problems. By eliminating them, you can potentially reduce inflammation, improve gut health, and experience greater energy levels. Rawnola is naturally gluten-free, making it an excellent choice for those with celiac disease or gluten sensitivity.
Moreover, preparing rawnola at home empowers you with unparalleled control over what goes into your food. You can select organic, high-quality nuts, seeds, and dried fruits, ensuring your cereal is free from pesticides and unwanted chemicals. You also dictate the type and amount of sweetener used, avoiding the excessive sugars often found in commercial granolas. This level of customization is crucial for maintaining a healthy diet, especially for those managing blood sugar levels or following specific dietary protocols like paleo or keto (by carefully selecting low-carb ingredients and sweeteners).
The "raw" aspect of rawnola is another significant advantage. By not baking the mixture at high temperatures, you preserve the enzymes, vitamins, and minerals that can be degraded by heat. This means you're getting the full nutritional punch from every ingredient. Nuts and seeds are powerhouses of healthy fats (omega-3s and omega-6s), protein, fiber, and essential micronutrients like magnesium, zinc, and selenium. These components contribute to heart health, brain function, satiety, and digestive regularity. For a deeper dive into the health advantages, you might want to read more about
Unlock Wellness: The Benefits of Grain-Free Rawnola.
Your Easy-to-Follow Homemade Grain-Free Rawnola Cereal Recipe
Crafting your own
homemade grain-free rawnola cereal is surprisingly simple and requires minimal effort, mostly just your food processor doing the hard work! Here’s a basic recipe that you can easily adapt to your liking.
Essential Ingredients:
- Nuts (2 cups total): A mix of raw almonds, walnuts, pecans, and cashews works wonderfully. Soaking them overnight (and dehydrating if you have a dehydrator) can improve digestibility and texture, but is optional.
- Seeds (1/2 cup total): Raw sunflower seeds, pumpkin seeds (pepitas), chia seeds, and ground flax seeds are excellent choices for added fiber and omega-3s.
- Dried Fruit (1 cup): Medjool dates are ideal for their natural sweetness and binding properties. Pitted prunes, dried figs, or unsweetened dried cranberries can also be used.
- Natural Sweetener (2-4 tablespoons): Maple syrup, agave nectar, or raw honey. Adjust to taste. For a keto-friendly version, use a sugar-free syrup or omit and rely on the dates.
- Flavor Enhancers:
- 1 teaspoon vanilla extract
- 1 teaspoon ground cinnamon
- 1/4 teaspoon sea salt (enhances all flavors)
- Optional: 1/4 teaspoon ground nutmeg, pinch of cardamom, or 1-2 tablespoons raw cacao powder for a chocolatey twist.
Equipment Needed:
- Large food processor
- Large mixing bowl
- Spatula or spoon
- Airtight containers for storage
- Optional: Dehydrator (for extra crispiness)
Step-by-Step Instructions:
- Prepare the Dried Fruit: If your dried dates (or other fruit) are very firm, soak them in warm water for 10-15 minutes to soften. Drain thoroughly before use. This makes them easier to process and helps bind the mixture.
- Process Nuts and Seeds: Add your chosen nuts and seeds to the food processor. Pulse several times until they are coarsely chopped. You want a varied texture – some finer pieces and some larger chunks for interest and crunch. Be careful not to over-process into a nut butter. Transfer about half of this mixture to a large mixing bowl.
- Combine with Dried Fruit: Add the softened dried dates (or other dried fruit) to the remaining nuts and seeds in the food processor. Process until the mixture starts to come together and resembles a sticky dough. The dates will help bind everything.
- Mix Everything Together: Transfer the date-nut mixture from the food processor to the large mixing bowl with the reserved coarsely chopped nuts and seeds.
- Add Flavorings: Pour in the maple syrup (or other sweetener), vanilla extract, cinnamon, sea salt, and any other desired spices or powders.
- Combine Thoroughly: Using your hands (the best tool for this!) or a sturdy spatula, mix all the ingredients together until they are very well combined. You want the mixture to be evenly coated and sticky enough to clump together when pressed.
- Form and Dry (Optional Dehydration):
- No Dehydrator: Spread the rawnola mixture onto a large baking sheet lined with parchment paper. Press it down firmly to form a thin, even layer. You can break it into clusters now or after it sets. Place it in the refrigerator for at least 2-4 hours to firm up.
- With Dehydrator: Spread the mixture thinly on dehydrator trays lined with non-stick sheets. Dehydrate at 105-115°F (40-46°C) for 8-12 hours, or until desired crispiness is achieved. Flip the rawnola partway through and break it into clusters to ensure even drying.
- Break into Clusters: Once the rawnola has firmed up or dehydrated, break it into delicious, chunky clusters.
Customizing and Elevating Your Rawnola Experience
One of the greatest joys of making
homemade grain-free rawnola cereal is the endless potential for customization. This isn't just a recipe; it's a template for your creativity.
Flavor Boosters & Add-ins:
- Chocolate Lover's Dream: Stir in raw cacao nibs or 1-2 tablespoons of raw cacao powder for a rich, antioxidant-packed chocolate flavor.
- Tropical Twist: Add shredded unsweetened coconut or a pinch of ground ginger.
- Citrus Zest: Grate in the zest of an orange or lemon for a bright, refreshing note.
- Spice it Up: Experiment with different spice combinations like pumpkin pie spice, allspice, or a touch of cayenne for a subtle kick.
- Superfood Boost: Mix in goji berries, mulberries, or spirulina powder for an extra nutritional punch.
- Seed Variety: Don't be afraid to try hemp seeds for a dose of protein and healthy fats.
Achieving the Perfect Texture:
- Chewy vs. Crumbly: For a chewier rawnola, use slightly fewer nuts and seeds and a bit more dried fruit and sweetener. For a crumblier, more traditional granola-like texture, process the nuts and seeds a bit more finely and ensure your mixture isn't overly sticky before drying.
- The Dehydrator Difference: While optional, a dehydrator truly elevates rawnola by giving it a wonderful, lasting crunch without cooking it. If you don't have one, chilling in the fridge will still yield a fantastic result, though it might be softer.
Storage and Serving Suggestions:
- Storage: Store your finished rawnola in an airtight container at room temperature for up to 1-2 weeks, or in the refrigerator for up to a month. For longer storage, you can freeze it for up to 3 months. Always ensure it's completely dry before storing to prevent mold.
- Serving Ideas:
- Classic Cereal: Serve with your favorite plant-based milk (almond, coconut, cashew).
- Yogurt Topping: Sprinkle generously over dairy-free yogurt or kefir for added texture and flavor.
- Smoothie Bowl Boost: A perfect crunchy topping for any smoothie bowl creation.
- On-the-Go Snack: Grab a handful for a quick, energizing snack.
- Dessert Topping: Use it to add crunch to fruit salads, puddings, or even dairy-free ice cream.
- Energy Bites: Blend a portion of your rawnola with a bit more nut butter and roll into balls for easy energy bites.
Embracing the DIY approach to
Craft Your Own Homemade Grain-Free Rawnola Cereal means you're always in control of its quality and taste.
Embrace a Healthier Breakfast with Homemade Goodness
By choosing to make your own
homemade grain-free rawnola cereal, you're not just preparing a meal; you're making a conscious decision towards a healthier, more vibrant lifestyle. This recipe offers a fantastic way to enjoy a breakfast that's rich in flavor, dense in nutrients, and completely free from grains, gluten, and refined sugars. It's an adaptable, delicious, and incredibly satisfying alternative that caters to a wide range of dietary needs and preferences. So, gather your ingredients, fire up your food processor, and embark on a delightful culinary journey that will revolutionize your breakfast routine. Your taste buds and your body will thank you!